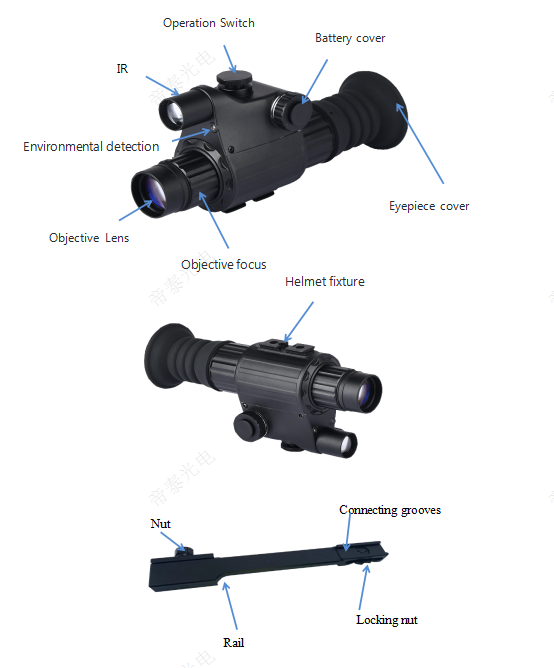
Gen2/Gen3 nightvision post clip on system

Model: DT-NSCB1

Short Description:

Product description

The DT-NSCB adopts a high-performance super-second-generation image intensifier, and the special post-aiming device is designed, the aiming effect at night is good, the structure adopts a full-metal body, the mechanical strength is high, the structure is small, and the structure is easy to assemble and disassemble. And the white light aiming device is matched with the white light aiming device, so that a good viewing effect can be achieved at night. In the night vision mode, the night-field sniping can be performed as long as the conditions for the use of the micro-illumination of 10-3 lux (with weak glow) can be met. The invention has the advantages of small specific area, light weight, convenient use, reliable performance and high cost performance. In addition, that front-to-scan has the function of automatic light-proof protection, and is very suitable for city operation. independently controllable The infrared light-supplementing device completely satisfies the different service conditions of the army and the police.


Technical specifications:

MODEL DT-NSCB1 DT-NSCB3
Generation Gen 2+/Gen3(optional) Gen 2+/Gen3(optional)
Magnification 0.85X 2X
Resolution 60-64 60-64
Objective pupil 22mm 40mm
FOV(°) 40 13.5
Exit pupil diameter (mm) 50 50
Distance of pupil 9 9
Eyepiece aperturemm +/-5 +/-5
Battery typev The 1 section 3V lithium battery The 1 section 3V lithium battery
Battery lifeh 40-50 40-50
Operating temperature(℃) -40 /+50 -40 /+50
Relative humidity 5%-98% 5%-98%
Impact resistance >800G >800G
Waterproof IP65/IP67optinal IP65/IP67optinal
Dimensionsmm 160x55x69(including eye mask) 250x58x70(including eye mask)
Weight g 295g(finished) 338g(finished)

Product Detail

Product Tags

20220629180613
20220629180649

Product description:

The DT-NSCB adopts a high-performance super-second-generation image intensifier, and the special post-aiming device is designed, the aiming effect at night is good, the structure adopts a full-metal body, the mechanical strength is high, the structure is small, and the structure is easy to assemble and disassemble. And the white light aiming device is matched with the white light aiming device, so that a good viewing effect can be achieved at night. In the night vision mode, the night-field sniping can be performed as long as the conditions for the use of the micro-illumination of 10-3 lux (with weak glow) can be met. The invention has the advantages of small specific area, light weight, convenient use, reliable performance and high cost performance. In addition, that front-to-scan has the function of automatic light-proof protection, and is very suitable for city operation. independently controllable The infrared light-supplementing device completely satisfies the different service conditions of the army and the police.

Technical Specifications:

MODEL DT-NSCB1 DT-NSCB3
IIT Gen2+&3 Gen2+&3
Magnification 0.85X 2X
Resolution 45-5751-64 45-5751-64
Les system F1: 1.2, F25mm F1: 1.4, F65mm
Objective pupil 22mm 40mm
FOVdegree 40 13.5
Objective adjustment range (m) 3--∞ 5--∞
Exit pupil diameter (mm) 50 50
Distance of pupil 9 9
Eyepiece aperturemm +/-5 +/-5
Installation Special front link bracket Special front link bracket
Battery typev The 1 section 3V lithium battery The 1 section 3V lithium battery
Battery lifeh 40-50  40-50 
Operating temperature℃) -40 /+50 -40 /+50
Relative humidity 5%-98% 5%-98%

Impact resistance

>800G

>800G

Environment rating IP65/(IP67optinal) IP65/(IP67optinal)
Dimensionsmm 160x55x69(including eye mask) 250x58x70(including eye mask)
Weight g 295g 338g
组合 35

1.Battery installation:

The CR123 battery (reference battery mark) is shown in Fig. 1.

Tack the battery into night vision battery cartridge. Lets battery

cover and batteryCartridge’s screw thread together ,Then clockwise

rotation and tightened to complete the battery installation.

组合 16

2.NO/OFF SETTING

As shown in Fig. 2, Turn the work switch along the clockwise direction.

The knob indicates the location of "ON", when the system starts to work.

组合 34

3. Eyepiece adjustment

Choose a target with moderate brightness. The eyepiece is adjusted

Without opening the lens cover. As in Figure 3, Turn the eyepiece

hand wheel clockwise or counterclockwise. To match the eyepiece,

when the most clear target image can be observed through an eyepiece,

The eyepiece adjustment is complete.

Different users need to readjust according to their vision.

组合 36

4. Objective lens adjustment

The objective adjustment is need to see the target at different distances. Before adjusting the lens, must adjust the eyepiece according to the above method. When adjusting the objective lens, choose a dark environment target. As shown in Figure 4,Open the lens cover and aim at the target.

Turn the focusing hand wheel clockwise or counterclockwise.Until you see the clearest image of the target, complete the adjustment of the objective lens. When observing targets at different distances, the objective needs to be adjusted again according to the above method.

5.Operation Mode

The working switch of this product has four gears. There are four modes in total, except OFF.

There are three modes of work: ON, IR and AT. Corresponding to normal working mode, infrared auxiliary mode and automatic mode, etc. As shown in Fig. 2.

6. infrared mode

The environmental illumination is very low (all black environment). When the night vision instrument cannot observe clear images, The working switch can be turned clockwise to one shift. As shown in Fig. 2, The system enters the "IR" mode. At this time, the product is equipped with infrared auxiliary lighting to turn on. Ensure normal use in all black environments.

Note: in IR mode, similar equipment is easy to be exposed.

7.Auto Mode

The automatic mode is different from the "IR" mode, and the automatic mode starts the environment detection sensor. It can detect environmental illuminance in real time and work with reference to illumination control system. Under extremely low or extremely dark environment, The system will automatically turn on infrared auxiliary lighting, and when the environmental illumination can meet normal observation, The system automatically closes "IR", and when the ambient illumination reaches 40-100Lux, The whole system is automatically shut down to protect the photosensitive core components from damage by strong light.

组合 39

8. Rear mounted mirror installation

Please install the sight before installing the rear mounted mirror.

loosen each nut on the connecting bracket of the rear mounted

mirror anticlockwise as shown in figure ⑤ - 1, then sleeve the

connecting bracket onto the eyepiece of the sight, and lock each

nut of the connecting bracket connecting the sight clockwise as

shown in figure ⑤ - 2. (Note: during installation, the general

guide rail direction of the rear mounted mirror connecting bracket is on both sides of the sight, not downward)

组合 28

(2)Before installing the rearview mirror, first cover the rearview mirror into the connecting bracket, observe the distance between the rearview mirror objective part and the eyepiece of the sight. If the distance between the rearview mirror objective part and the eyepiece of the sight is too far or too close, then adjust the distance between the two sections of the connecting bracket after loosening the bracket with a hexagon screwdriver until the objective part of the rearview mirror and the eyepiece of the sight can be connected, and lock them Hexagonal screw. As shown in figure ⑤ - 3.

图片 58
图片 74
组合 73

(3)After confirming the distance between the connecting brackets of the rear mounted mirror, sleeve the objective part of the rear mounted mirror into the connecting bracket, as shown in figure ⑤ - 4. Align and connect the objective part of the rear mounted mirror with the eyepiece of the sight, and finally lock each nut of the connecting bracket connecting the position of the rear mounted mirror clockwise, as shown in figure ⑤ - 5, and the installation is completed.

Common questions :

1.No power

A. please checks whether the battery is loaded.

B. checks whether there is electricity in the battery.

C. confirms that the ambient light is not too strong.

2. Target Image is not clear.

A. check the eyepiece, whether the objective lens is dirty.

B. Check the lens cover open or not ?if at night time

C. confirm whether the eyepiece is properly adjusted (refer to eyepiece adjustment operation).

D. Confirm the focusing of the objective lens ,whether finished adjusted.r (referring objective lens focusing operation).

E. confirms whether infrared light is enabled when the environments all back.

3.Automatic detection not working

A. automatic mode, when glare automatic protection does not work. Please check if the environmental testing department is blocked.

B. flip, the night vision system does not automatically turn off or install on the helmet. When the system is in normal observation position, the system cannot start normally. Please check the position of the helmet mount is fixed with the product. (reference headwear installation)

Noted:

1.Anti-strong light

The night vision system is designed with automatic anti-glare device. It will automatically protect when encountering strong light. Although the strong light protection function can maximize the protection of the product from damage when exposed to strong light, but repeated strong light irradiation will also accumulate damage. So please do not put products in strong light environment for a long time or many times. So as not to cause permanent damage to the product.。

2.Moisture-proof

The night vision product design has waterproof function, its waterproof ability up to IP67 (optional), but long-term humid environment will also slowly erode the product, causing damage to the product. So please store the product in a dry environment.

3.Use and preservation

This product is a high precision photoelectric product. Please operate strictly according to the instructions. Please remove the battery when it is not used for a long time. Keep the product in a dry, ventilated and cool environment, and pay attention to shading, dust-proof and impact prevention.

4.Do not disassemble and repair the product during use or when it is damaged by improper use. Please

contact the distributor directly.


  • Previous:
  • Next: