product feature:
1. The only equipment in the world that truly realizes large field of view 50 degrees night vision (40 degrees optional)
2. Small distortion (< 0.5%), high fidelity image, no deformation of the observation picture
3. Built-in working status indicator to know the device status at any time
4. Real-time monitoring of ambient brightness, automatic strong light off protection, automatic infrared complement (automatic mode)
5. Visual range can be self-adjusting (+4/-6, +6/-4) strong adaptability
6. Good off-axis effect, avoid shaking can not be clear imaging
7. Optional manual aperture for easy adjustment of light intake
8. The extra long pupil distance is 30-45mm to meet the needs of different types of customers
9. Eye spacing locking function to avoid repeated debugging during homing
10. Automatic upturning, side turning off, more convenient operation
11. Battery universal design, CR123 lithium battery /5 battery can be used
12. Waterproof rating can reach IP65/IP67
Self-developed characteristic material, high temperature resistance, high strength, anti-battery radiation
Product Parameter:
| project | DTS-33N(40 °) |
| Structural mode | Arbitrary turn it over |
| Flip detection | Automatically detect and power off when turning up |
| Power supply mode | Lithium battery (cr123x1) / AAAx1 |
| Battery voltage range | 1.2-1.6/2.4-4.2V |
| Installation mode | Head mounted(standard American helmet interface) |
| Control mode | ON/IR/AUTO |
| Overall power consumption | <0.1W |
| Battery capacity | 500-800maH |
| Battery life | 30-50H |
| Optical multiplier | 1X |
| Full field of view | >40 ° |
| Parallelism of optical axis | <0.5 ° |
| Image intensifier | Gen2+/3 |
| Optical aperture | F1.18 25mm |
| Optical MTF | 120LP/mm |
| Optical distortion | <0.5% Max |
| Relative illumination | >75% |
| Optical coating | Multilayer broadband coating |
| Focusing range | 250mm-∞ |
| Focusing mode | manual focus facility |
| Eyepiece exit pupil distance | 25-40mm (full field of view) |
| Eyepiece caliber | 30mm |
| Eyepiece exit pupil aperture | 9mm |
| Range of visibility | -6~+4 / -4~+6 (adjustable) |
| Mode of eye spacing adjustment | Arbitrary continuous adjustable |
| Distance adjustment range | 50-80mm |
| Eye spacing locking mode | Manual lock (Optional) |
| Luminance gain mode | Automatic gain or manual gain is optional |
| Auxiliary light source | 850nm 20mW |
| Applicable temperature | -40–+55℃ |
| Humidity range | 5%-95% |
| Waterproofing class | IP65/IP67 |
| Product size | 108x106x83 108x118x83 |
| Product weight (no battery) | 460G(without battery) |
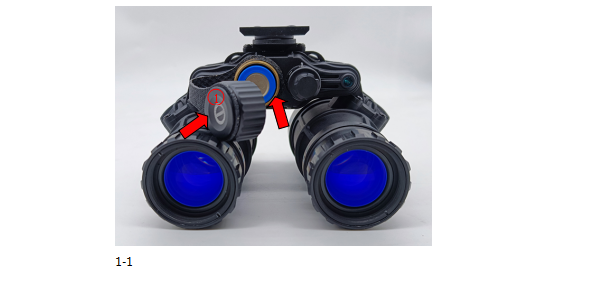
1.Battery installation
1.1Installing lithium batteries
As shown in Fig.1-1, install a lithium battery (polarity reference battery mark) into the night vision battery cartridge. The battery cover mark (1) in Fig.1-1 indicates that the positive electrode faces inward and the negative electrode faces outward. Align the battery cover with the battery cartridge thread and tighten it clockwise to complete the installation. If the battery is loaded backwards, it cannot be turned on and needs to be refilled.
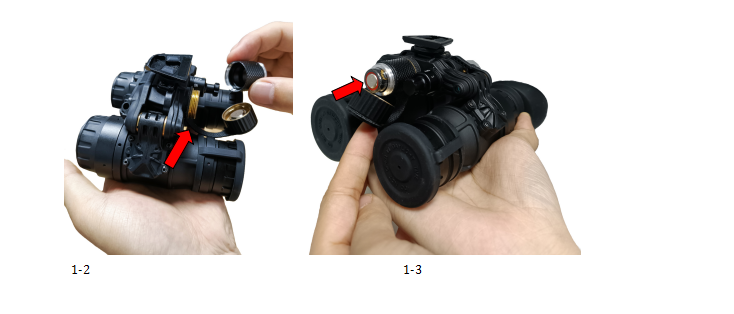
1.2Replace AAA batteries
Fig.1-2 Add the optional battery compartment to the position of the primary battery cover, that is, extend the length of the battery compartment and change the battery type. In Figure 1-3, install the battery compartment using the No. 5 dry battery (the polarity of the battery label is used), align the battery cover with the thread of the battery container, and tighten the battery cover clockwise. The DTS-33N night vision device has realized the sharing of two batteries, so that the night vision device can adapt to different use scenarios.
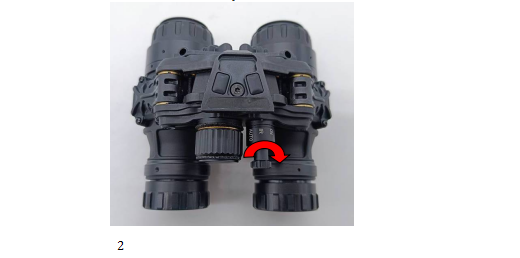
2.On/ Off setting
As shown in Fig.2, rotate the switch one step in the clockwise direction, rotate the switch to the position of “ON”, the system is turned on, and then the system lights up the image tube and starts to work. (Clockwise rotation: ON/IR/AUTO) The infrared auxiliary light source is enabled in IR mode. The ATUTO file enters the automatic mode, etc., and switches successively. When it is closed, it needs to switch back to the OFF gear.
3.Eyepiece distance adjustment
After users wear this product, they can adjust the program spacing according to their own eye distance. Adjustment method: Adjust the left and right sides separately. First look at the right eyepiece with the right eye and adjust it until you see a complete round picture. Then close the right eye and look at the left eyepiece with the left eye and fine-tune the eye distance until you see a complete round picture. At this time, both eyes observe at the same time, can observe the complete circular picture, after the completion of debugging, the eyes can see the largest and clearest field of view.
Locking method: This night vision device is equipped with an eye distance locking hand wheel, as shown in Fig.3-1: it can be clockwise or counterclockwise
Turn the adjusting hand wheel to lock the eye distance, as shown in Fig.3-1, adjust the extension support rod counterclockwise, and shorten the support rod clockwise. Different lengths control different eye distances, and adjust the length well to lock the eye distance, as shown in Fig. 3-2, the eye distance has been locked, and the distance will not be reduced any more, and the same person can directly observe the next use. No need to adjust again. The eye spacing lock component is optional, and you can choose not to install this component for extreme lightweight.
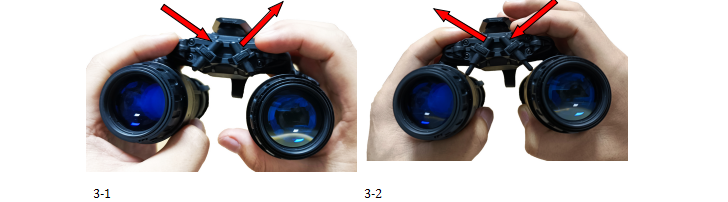
When used by different users, you can adjust the distance and comfort of your eyes according to the previous method, after adjusting the eye distance, turn the first round of adjustment lock, you can achieve the eye distance lock.
4.Eyepiece adjustment
Select a target with moderate ambient brightness and adjust the eyepiece without opening the objective cover. As shown in Fig.4, turn the eyepiece hand wheel clockwise or counterclockwise to match the visual degree of the human eye. When the clearest target image can be observed through the eyepiece, the eyepiece adjustment is completed. When used by different users, it needs to be re-adjusted according to their own vision.
5.Objective adjustment
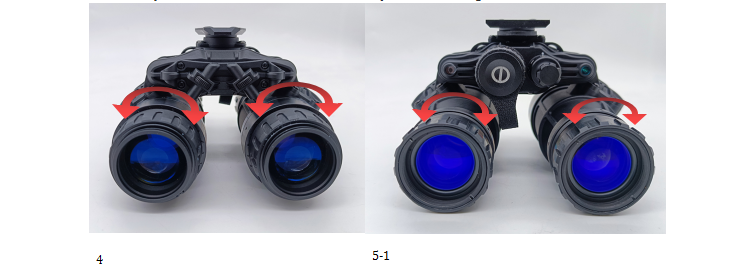
The purpose of adjusting the objective lens is to see the scenery at different distances clearly. Before adjusting the objective lens, please adjust the eyepiece according to the above method. When adjusting the objective lens, select a dark environment target. As shown in Fig.5-1, open the objective lens cover, align with the target, turn the focusing hand wheel of the objective lens clockwise or counterclockwise, until the clearest environment image is seen, and adjust the objective lens. When viewing objects at different distances, the objective lens needs to be calibrated again according to the above method.
5.1Objective focus lock
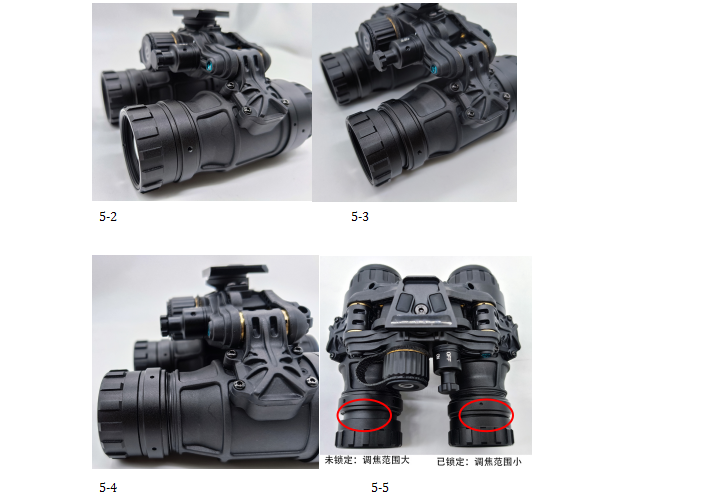
After adjusting the focus of the objective lens, if you need to observe the target at the same distance for a long time, you can use the objective lens focusing lock function to avoid focusing changes. As shown in Fig.5-2, the focusing hand wheel and locking ring of the objective lens are in place; As shown in Fig.5-3, focus the objective lens to the desired position and see a gap 1-2 mm wide; As shown in Fig.5-4, gently rotate the focusing lock ring to lock the focusing hand wheel. As shown in Fig.5-5, the focusing lock ring locks the focusing hand wheel, and the focusing range of the objective lens becomes smaller
5.2Eyepiece visual range adjustment
You can adjust the viewing range of the eyepiece when adjusting the viewing range, the general range is +5° to -5° You can adjust the range from -6° to +4°, to -4° to +6°, change the upper and lower limits of the viewing, so that the viewing is more convenient.
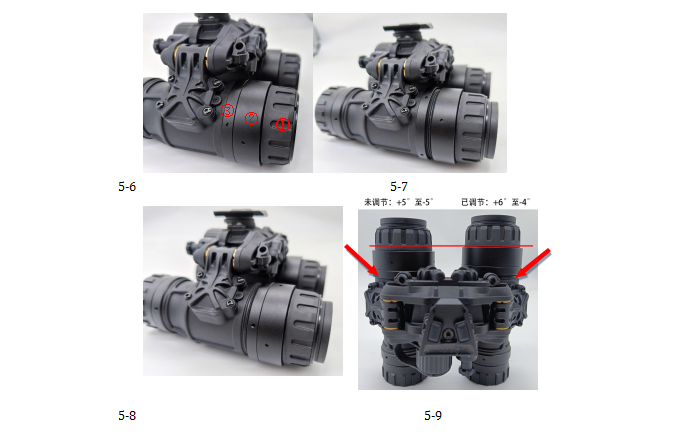
The process is as follows: If the eyepiece diopter is adjusted to +5° and still cannot see clearly, you can choose to adjust the viewing range to +6°. Method: As shown in Figure 5-6, turn the eyepiece optically adjusting hand wheel (1) clockwise until it does not move. As shown in Figure 5-7, rotate the eyepiece retaining ring (2) counterclockwise to reveal a thread of 1-2mm. As shown in Figure 5-8, turn the viewing range lock (3) counterclockwise and clamp it tightly with the eyepiece retaining ring (2). As shown in Figure 5-9, the adjustment is complete, and the upper limit of the diopter is +6° to -4°.
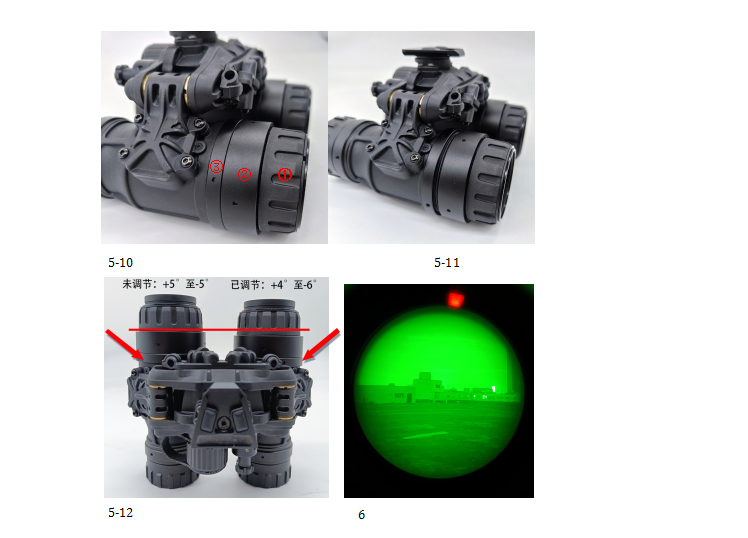
If the eyepiece diopter is adjusted to -5° but still cannot see clearly, you can choose to adjust the viewing range to -6°. Method: As shown in Figure 5-10, turn the eyepiece optically adjusting handwheel (1) counterclockwise until it does not move; As shown in Figure 5-11, rotate the eyepiece retaining ring (2) counterclockwise until it is loose. As shown in Figure 5-11, turn the range lock (3) clockwise to the end and tighten the eyepiece retaining ring (2) clockwise. The viewing range lock (3) and the eyepiece retaining ring (2) are clamped together. As shown in Figure 5-12, the adjustment is complete, and the diopter range is +4° to -6°.
- Infrared mode
When the ambient illumination is very low (all black environment), resulting in the night vision device can not observe a clear image, you can turn the working switch clockwise again. When the system enters the “IR” mode, the built-in infrared auxiliary lighting of the night vision device is turned on to ensure normal use in the all-black environment. Note: In infrared mode, if similar equipment is encountered, it is easy to expose the target. As shown in Figure 6, in infrared mode, you can see the internal infrared indicator light steady on through the eyepiece of the night vision device.
- Auto Mode
The automatic mode differs from the “IR” mode in that the automatic mode activates the environmental detection sensor, which can detect the ambient illumination in real time and work with reference to the illumination control system. When the ambient illumination is low or all black, the system will automatically turn on the infrared auxiliary lighting, when the ambient illumination can meet the normal observation, the system will automatically turn off the “IR”, when the ambient illumination reaches 40-100Lux, the whole system will automatically turn off to protect the core components from being damaged by strong light. In automatic mode, if the night vision device is in full black, the infrared light is automatically turned on. At this time, you can see the internal infrared indicator light on through the eyepiece. If the light becomes stronger, the infrared supplementary light is turned off, and the infrared indicator is turned off immediately.
8.Head mounted installation
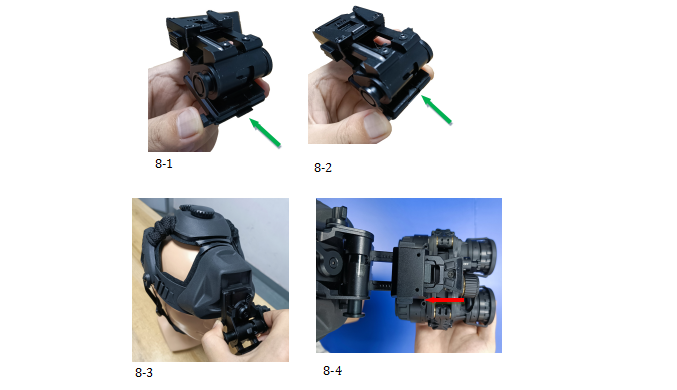
Check the helmet mounting device (dump truck), and press the latch on the device as shown in Fig. 8-1 to make the lock spring back into the device of the helmet mounting device, as shown in Fig.8-2. Helmet pendant (dump truck) can be used.
Then align the buckle of the helmet pendant with the universal slot of the helmet, release the latch, and gently press the buckle as shown in Fig.8-3. Release the latch so that the lock core ejects and locks the helmet, and the support firmly locks the helmet. Then install the night vision device.
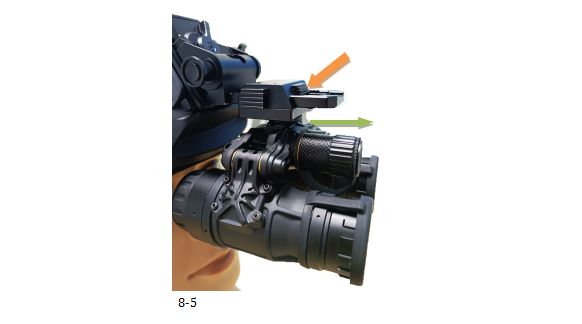
As shown in Fig.8-4, after the helmet mounting device is installed on the helmet, align the universal clamp of the night vision device with the device slot of the helmet mounting device by the eyepiece, and press the clamp inward until you hear a click. Then release the device. The night vision device is assembled. (Note: When removing the device from the helmet mounting device, press the button indicated by the oblique arrow in Fig.8-5 and pull out the night vision device, as shown by the arrow in Fig.8-5.)
9.Head mounted adjustment
In order to ensure the adaptability of users when using this system, the helmet pendant system has designed a perfect fine-tuning structure to meet the needs of different users.
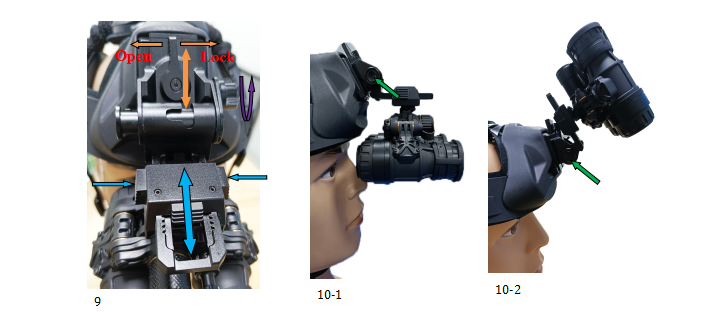
Adjust up and down: When it is necessary to adjust the upper and lower distance between the night vision eyepiece and the human eye, first turn the lock knob in the direction marked Open to unlock (left arrow direction), after unlocking, you can adjust up and down (two-way arrow direction is up and down), adjust the product eye distance to the most suitable height for observation, turn the lock knob in the direction marked lock (right arrow direction), and complete the up and down adjustment. The brown arrow is shown in Fig.9.
Front and rear adjustment: When you need to adjust the distance between the night vision eyepiece and the human eye, hold down the front and rear adjustment locks on the left and right sides of the night vision component (blue arrows) at the same time, do not release the hand, slide the night vision component back and forth (blue arrows direction), adjust it to the appropriate position, and release the hand to lock it automatically, as shown in Fig.9.
Flip fine-tuning: The flip fine-tuning knob has two gears, clockwise or counterclockwise rotation, the night vision device will slightly raise or slightly tilt down, you can fine tune the distance between the night vision eyepiece and the human eye. Fig.9 shows the purple arrow
10.Head flip, night vision left and right flip
After the product has been worn, in the actual use process, if the night vision device is not used for the time being, the night vision device can be turned over and placed on the helmet, so that it does not affect the current line of sight and is convenient to use at any time. Upturn off: If you need to observe the device with the naked eye, press and hold down the upturn button (pointed by the arrow) of the helmet pendant to turn the night vision component upward. Release the upturn button of the helmet pendant, and the system automatically locks the upturn state, and the night vision device enters the shutdown state, as shown in Fig.10-1.
When you need to put down the night vision component for observation, you also need to press the flip button of the helmet pendant first, and the night vision component will automatically turn back to the working position to start up and lock the working position.
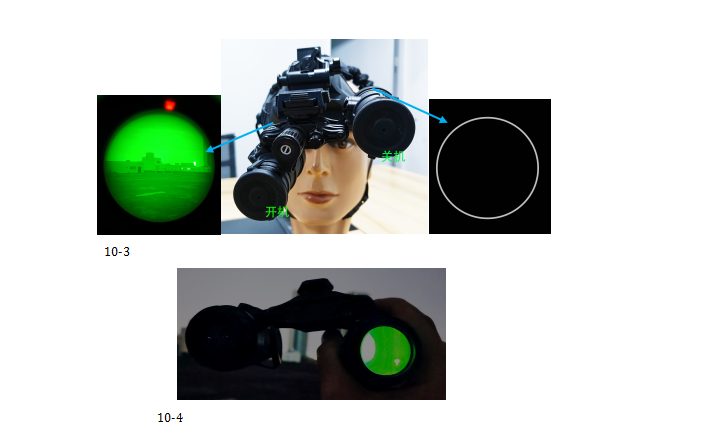
Rollover off: When the night vision component is turned over to the side, the single-side night vision device will automatically be turned off without night vision screen; The other side is unaffected and continues to work. When you return to the working position, the night vision system automatically starts and works normally, as shown in Figure 10-3 (red light indicates an infrared indicator). 10-4 is the on-off condition of the rollover in actual use, with the left side turning off and the right side turning on normally. The magnetic induction sensitivity of the helmet bracket is very good, and it turns off immediately after turning on its side.
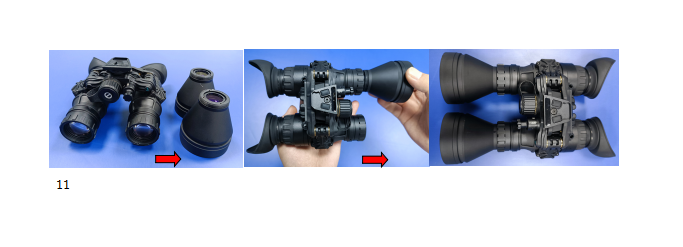
11. 串联增倍镜
The night vision instrument can change the magnifying mirror to change the viewing magnification to meet the requirements of different viewing distances. (When the series magnifier is used, it has no effect on the waterproof ability of the night vision device itself) Before the series magnifier, open the original objective lens cover and twist the corresponding aperture magnifier directly to the front end of the original objective lens. As shown in Figure 11, install the 3-fold lens in sequence.
Common questions:
1.No power
A. please checks whether the battery is loaded.
B. checks whether there is electricity in the battery.
C. confirms that the ambient light is not too strong.
2.Target Image is not clear
A. check the eyepiece, whether the objective lens is dirty.
B. Check the lens cover open or not ?If at night time.
C.Confirm whether the eyepiece is properly adjusted (refer to eyepiece adjustment operation).
D. Confirm the focusing of the objective lens ,whether finished adjusted.r (referring objective lens focusing operation).
E. confirms whether infrared light is enabled when the environments all back.
3.Automatic detection not working
A. automatic mode, when glare automatic protection does not work. Please check if the environmental testing department is blocked.
B. flip, the night vision system does not automatically turn off or install on the helmet. When the system is in normal observation position, the system cannot start normally. Please check the position of the helmet mount is fixed with the product. (reference head wear installation)
Noted:
1.Anti-strong light
The night vision system is designed with automatic anti-glare device. It will automatically protect when encountering strong light. Although the strong light protection function can maximize the protection of the product from damage when exposed to strong light, but repeated strong light irradiation will also accumulate damage. So please do not put products in strong light environment for a long time or many times. So as not to cause permanent damage to the product.。
2.Moisture-proof
The night vision product design has waterproof function, its waterproof ability up to IP67 (optional), but long-term humid environment will also slowly erode the product, causing damage to the product. So please store the product in a dry environment.
3.Use and preservation
This product is a high precision photoelectric product. Please operate strictly according to the instructions. Please remove the battery when it is not used for a long time. Keep the product in a dry, ventilated and cool environment, and pay attention to shading, dust-proof and impact prevention.
4.Do not disassemble and repair the product during use or when it is damaged by improper use. Please contact the distributor directly.
Post time: Jun-29-2023

