Product description:
DTS-22n is a high-performance military head mounted night vision binocular built by Detyl Optoelectronics . Low light DTS-22n has the characteristics of super large field of view, high definition, no distortion, light weight, high strength (the overall performance is much better than the original version of the U.S. military products), which is the ideal choice for military night equipment.
Product feature:
1.FOV 40° and FOV 50 °(optional) ,We are the only that can achieve FOV 50°.
2. Special design, adopted folding light path and veneer design ,low cross section structure.
3.High-fidelity image, and no distortion in the observation screen.
4. Built-in working indicator , keep abreast of the using status.
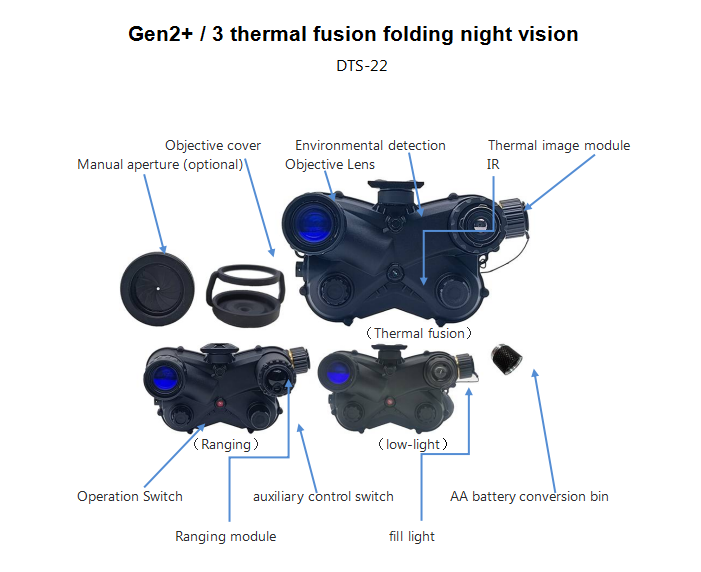
5. With low light, low light thermal fusion, low light plus video input, low light plus ranging
4 versions.
6.In the auto mode, the IR is adjusted by environment brightness.
7.Long and short IR light can be selected.
8. Self-developed special materials, high strength, high temperature resistance, light weight, and battery radiation resistance.
9. Center of gravity back, close to the face, head wear comfortable,lightweight to wear
10.We achieved Flip up down ON/OFF and side up down ON/OFF. (must use the original Detyl mounts).
11. Universal battery design, both CR123 battery and AA battery can be used.
12. The waterproof can reach IP65/IP67.
13. Thermal imaging function is easy to use , one-button switch, easy to operate.
14. Large FOV thermal imaging (thermal imaging maximum FOV 50 ° ), thermal imaging and low-light full-screen fusion.
Specifications:
|
MODEL |
DTS-22N |
DTS-22N(Thermal fusion) |
|
IIT |
Gen2+ |
Gen2+ |
|
FOV(deg) |
50 |
50 |
|
Magnification |
1X |
1X |
|
Battery type(v) |
CR123A(1) / CR23A(4) external battery box |
CR123A(1) / CR23A(4)external battery box |
|
Power supply(v) |
1.2-1.6/2.5-4.2 |
1.2-1.6/2.5-4.2 |
|
Control mode |
ON/IR/AUTO |
ON/IR/AUTO |
|
Battery capacity |
300-3200maH |
300-3200maH |
|
Battery life(hrs) |
30-100 |
30-100 |
|
Lens system |
F1.18 ,22.5mm |
F1.18 ,22.5mm |
|
Optics MTF(LP/mm) |
120 |
120 |
|
Total Darkness IR System |
YES |
YES |
|
Automatic Brightness Control |
YES |
YES |
|
Bright Light Cut-off |
YES |
YES |
|
Infrared Illuminator |
Built-in |
Built-in |
|
IR Indicator |
YES |
YES |
|
Low Battery Indicator |
YES |
YES |
|
Optical distortion |
1% Max |
1% Max |
|
Relative Illumination |
>75% |
>75% |
|
Range of focus(m) |
0.25—∞ |
0.25—∞ |
|
Distance of pupil |
30-35mm |
30-35mm |
|
Eyepiece aperture |
9mm |
9mm |
|
Diopter(deg) |
+ / – 5 |
+ / – 5 |
|
display resolution |
1280×720 |
1280×720 |
|
Thermal image wavelength |
8-12uM |
|
|
Thermal image resolution |
384×288 |
|
|
Fusion mode |
Optical fusion |
|
|
IR |
850nm 20mW |
850nm 20mW |
|
Operating temperature(℃) |
-40–+55 |
-40–+55 |
|
Relative humility |
5%-95% |
5%-95% |
|
Environmental Rating |
IP65/IP67 |
IP65/IP67 |
|
Dimensions(mm) |
80x132x81 |
80x132x81 |
|
Wight(g) |
430 |
430 |
Instructions:
- Battery installation
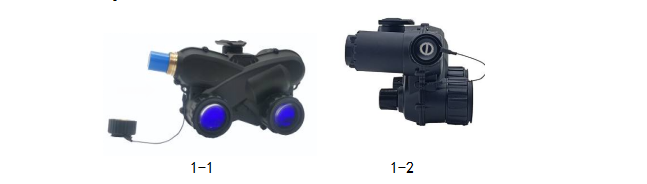
Install a lithium battery (polarity reference battery label) into the night vision battery barrel, align the battery cover with the battery barrel, and fasten the battery clockwise, as shown in Fig. 1-2.
2.On/ off setting
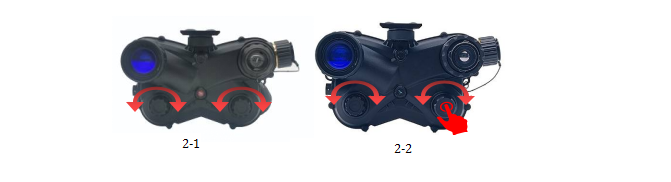
Fig.2-1, rotate the work switch for one gear clockwise, rotate the indicator light to the position of “ON”, and the system will start up. At this time, the system will light up the image tube and start to work. (Clockwise rotation: ON/IR/AUTO) Turn on the infrared auxiliary light source in IR mode; AUTO file into automatic mode, etc. Turn the brightness switch clockwise or counterclockwise to adjust the brightness of the thermal imaging screen, as shown in Fig.2-2.
a.low light night vision
As shown in Fig. 2-1, after turning ON the main control switch, turn the switch clockwise to set the ON, IR, and AUTO gears. You can select different gears according to the operating environment. The auxiliary control switch is to control the brightness of the infrared fill light. In the no light environment, manually adjusting the fill light brightness can get the desired fill light effect, and the night observation is more convenient. The low-light version can be selected with far-light and near-light infrared auxiliary lighting.
b.Thermal Fusion Night Vision Switch
As shown in Fig. 2-1, after turning on the main control switch, turn the switch clockwise to have three gears of ON/IR/AUTO. As shown in Fig. 2-2: When the main control switch is ON/IR/AUTO, press and hold the auxiliary control switch (about 5 seconds) to start the thermal fusion system; in the normal working state, press and hold (about 5 seconds) The thermal imaging system is turned off; in the normal working state, the main control switch is directly turned off, and the low-light system and the thermal imaging system are turned off at the same time.
Menu operation: The switch operation of the thermal fusion module is similar to that of the thermal imager, but the shape is different. You need to press and hold the switch for 5 seconds to turn it on. After entering the thermal imaging mode, the operation method is the same as that of the thermal imager. Short press the switch once to enter the main menu. At this time, turn the knob left and right to select the menu left and right. Press the switch again to enter the second column of the menu. At this time, turn the knob left and right to select the option of the second column menu. If you need to return in the first column, you need to go to [Back] and press the switch.
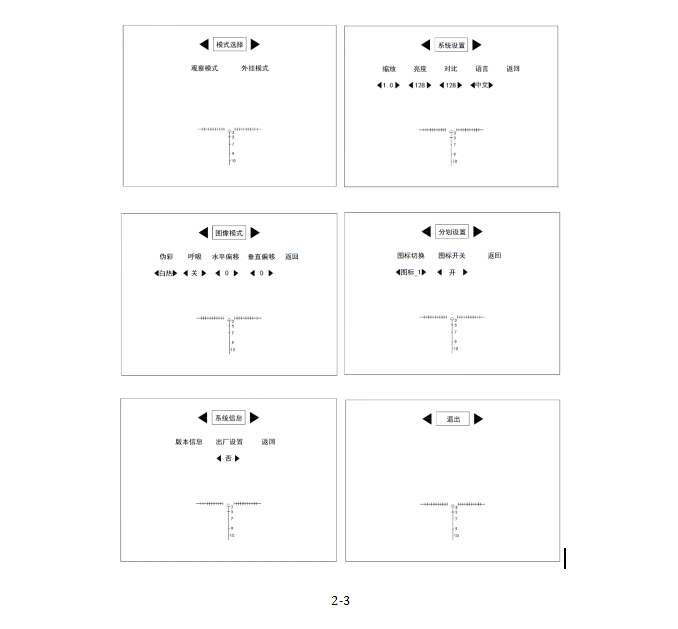
If the option in the second column is selected, press the switch again to enter the option in the third column. When the cursor [ ] is in the third column, you can directly press the switch once to return to the second column. In the same way, press it again to enter the third column to adjust the specific parameters. Adjustment method: rotate the knob left and right to adjust the parameter size and mode. Press the key to return to the first column; select [Exit] in the options in the first column, press the key to exit the menu (in menu mode, press the key for 3 seconds to exit the menu directly), and complete the debugging. Group picture 2-3 is each option bar in the menu.
Mode selection: [observation mode] [plug-in mode]
System Settings: [Zoom] (1-3 times)/Brightness/Contrast/Language (Chinese, English)/Back
Image Mode: False Color (White Hot /Black Hot /Green Base /Metal /Outline )/ Breathing /Horizontal Offset /Vertical Offset/Return}
Reticle setting: icon switch [4 types]/icon switch/return
System information: version information/factory settings/return
Exit: After selecting [Exit], press the switch once to exit the menu
c.Ranging module
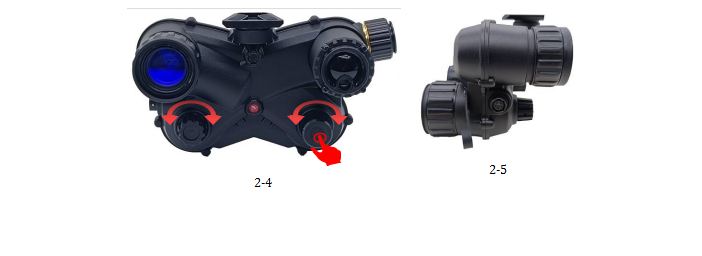
As shown in Fig. 2-4, after the main control switch is turned ON, the low-light function and ranging function of the night vision device will automatically start to work. Turn the switch clockwise to the ON/IR/AUTO three gears, each of which can operate the ranging function. The auxiliary control switch controls access to the menu of the ranging function. Can achieve the function: single ranging, high frequency continuous ranging (2-10 seconds/time), low frequency continuous ranging (10-20 seconds/time), through the auxiliary switch can also adjust the ranging menu brightness.
d.Video input version
After the main control switch is turned ON, the night vision device’s low-light function starts to work, and the switch is rotated clockwise to the three gears ON/IR/AUTO. The auxiliary control switch can control the video input functions {video brightness /mode / contrast /horizontal offset}.
As shown in Fig. 2-5, the video input interface is connected with a dedicated data cable, and the other end is connected with a signal cable and an external power supply respectively. Because the video input function needs to be powered separately, an external battery box can be worn to power the video input function for a long time. The low-light part uses electricity independently(CR123A(1)).
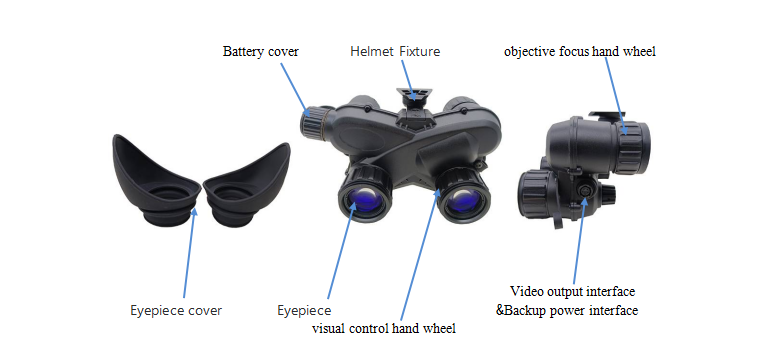
3.Eyepiece distance adjustment
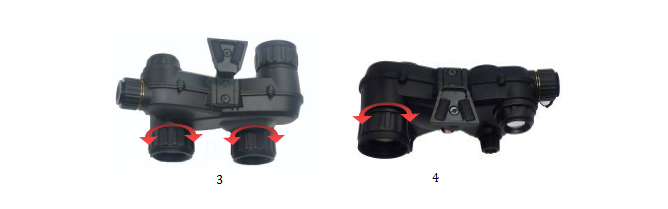
Select a target with moderate ambient brightness and adjust the eyepiece without opening the objective lens cover. As shown in Fig.5, turn the eyepiece hand wheel clockwise or counterclockwise to match the visual acuity of the human eye. When the clearest target image can be observed through the eyepiece, the eyepiece adjustment is completed. When used by different users, they need to readjust according to their own vision.
4.Objective lens adjustment
Objective lens adjustment is to see objects at different distances. Before adjusting the objective lens, adjust the eyepiece according to the previous method. When adjusting the objective lens, select a dark environment target. As shown in Fig.3, open the objective lens cover, align with the target, turn the objective lens focusing hand wheel clockwise or counterclockwise, until you see the clearest environmental image, and complete the objective adjustment. When observing objects at different distances, the objective lens needs to be adjusted again according to the above method.
5.Infrared mode
When the ambient illumination is very low (all black environment), so that the night vision cannot observe clear images, you can turn the working switch clockwise for another gear. As shown in Fig. 1-2, the system enters the “IR” mode. At this time, the built-in infrared auxiliary lighting of the night vision is turned on to ensure normal use in the all-black environment.
Note: In infrared mode, if similar equipment is encountered, it is easy to expose the target.
6.Auto Mode
The automatic mode differs from the “IR” mode in that the automatic mode activates the environmental detection sensor, which can detect the ambient illumination in real time and work with reference to the illumination control system. When the ambient illumination is low or all black, the system will automatically turn on the infrared auxiliary lighting. When the ambient illumination can meet the normal observation, the system will automatically turn off the “IR”. When the ambient illumination reaches 40-100Lux, the whole system will automatically turn off to protect the core components from being damaged by strong light.
7.Head-mounted installation
First, switch the helmet hanger device to the unlocked state, as shown in Fig.7-1. Push the lock latch of the helmet hanger device to the right to make the lock bolt spring back into the helmet hanger device, as shown in Fig7-2.
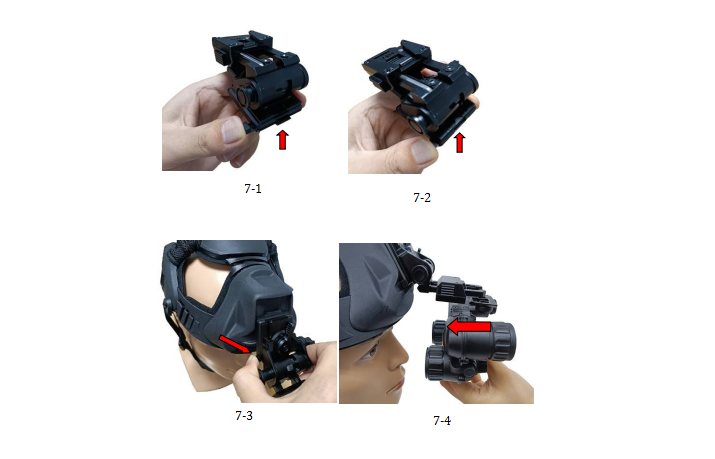
As shown in Fig.7-3, align the buckle of the helmet mounting fastener with the universal slot of the helmet, release the buckle to eject the lock core, and press gently to complete the installation. After the helmet mounting device is installed on the helmet, align the universal clamp of the night vision device with the device slot of the helmet mounting device by the eyepiece, and press the clamp inward (in the arrow direction), as shown in Fig.7-4, until you hear a click and release the device. The night vision is assembled .
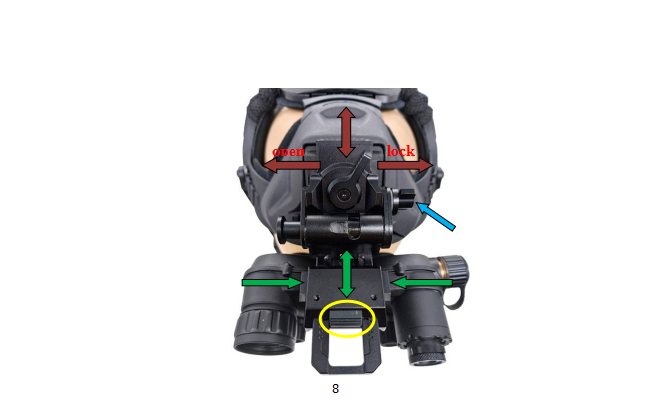
8.Helmet adjustment
In order to ensure the adaptability of users when using this system, the helmet pendant system is designed with perfect fine-tuning structure to meet the needs of different users. Up and down adjustment: When it is necessary to adjust the up and down distance between the night vision eyepiece and the human eye, first turn the lock knob in the direction marked Open to unlock it, and then adjust it up and down after unlocking it. After adjusting the product eyepiece to the height most suitable for observation, turn the lock knob in the direction marked lock to lock it, and complete the up and down adjustment, as shown in Fig.8 in brown. Front and rear adjustment: When you need to adjust the distance between the eyepiece and the human eye, hold down the front and rear adjustment latches on the left and right sides of the night vision component at the same time. Do not let go. Slide the night vision component forward and backward and adjust it to an appropriate position. Rollover fine-tuning: The rollover fine-tuning knob has two gears. When rotated clockwise or counterclockwise, it can fine-tune the distance between the eyepiece and the human eye. As shown in blue.
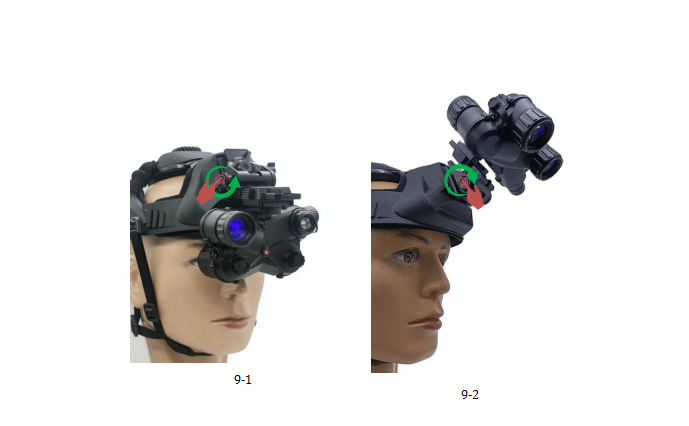
9.Head flip
After the product has been worn, if the night vision is not used temporarily during the actual use, it can be turned over and placed on the helmet, so that the current vision will not be affected and it is convenient to use at any time. When you need to observe with naked eyes, hold down the flip button of the helmet pendant, as shown in Fig.9-1, to turn the night vision component upward. When the rotation Angle reaches 170 degrees, release the flip button of the helmet pendant, and the system will automatically lock the flip state, as shown in Fig.9-2. When you need to put down the night vision component for observation, you also need to press the flip button of the helmet pendant first. The night vision component will automatically turn back to the working position and lock the working position, as shown in Fig.9-2. When the night vision module is turned over to the helmet, the system night vision device will automatically be turned off. When it is turned back to the working position, the night vision device system will automatically start and work normally.
Common questions:
- No power
A. please checks whether the battery is loaded.
B. checks whether there is electricity in the battery.
C. confirms that the ambient light is not too strong.
- Target Image is not clear.
A. check the eyepiece, whether the objective lens is dirty.
B. Check the lens cover open or not ?if at night time
C. confirm whether the eyepiece is properly adjusted (refer to eyepiece adjustment operation).
D. Confirm the focusing of the objective lens ,whether finished adjusted.r (referring objective lens focusing operation).
E. confirms whether infrared light is enabled when the environments all back.
- Automatic detection not working
A. automatic mode, when glare automatic protection does not work. Please check if the environmental testing department is blocked.
B. flip, the night vision system does not automatically turn off or install on the helmet. When the system is in normal observation position, the system cannot start normally. Please check the position of the helmet mount is fixed with the product. (reference head wear installation)
Noted:
1.Anti-strong light
The night vision system is designed with automatic anti-glare device. It will automatically protect when encountering strong light. Although the strong light protection function can maximize the protection of the product from damage when exposed to strong light, but repeated strong light irradiation will also accumulate damage. So please do not put products in strong light environment for a long time or many times. So as not to cause permanent damage to the product.。
2.Moisture-proof
The night vision product design has waterproof function, its waterproof ability up to IP67 (optional), but long-term humid environment will also slowly erode the product, causing damage to the product. So please store the product in a dry environment.
3.Use and preservation
This product is a high precision photoelectric product. Please operate strictly according to the instructions. Please remove the battery when it is not used for a long time. Keep the product in a dry, ventilated and cool environment, and pay attention to shading, dust-proof and impact prevention.
4.Do not disassemble and repair the product during use or when it is damaged by improper use. Please
contact the distributor directly.
Post time: Jun-29-2023

