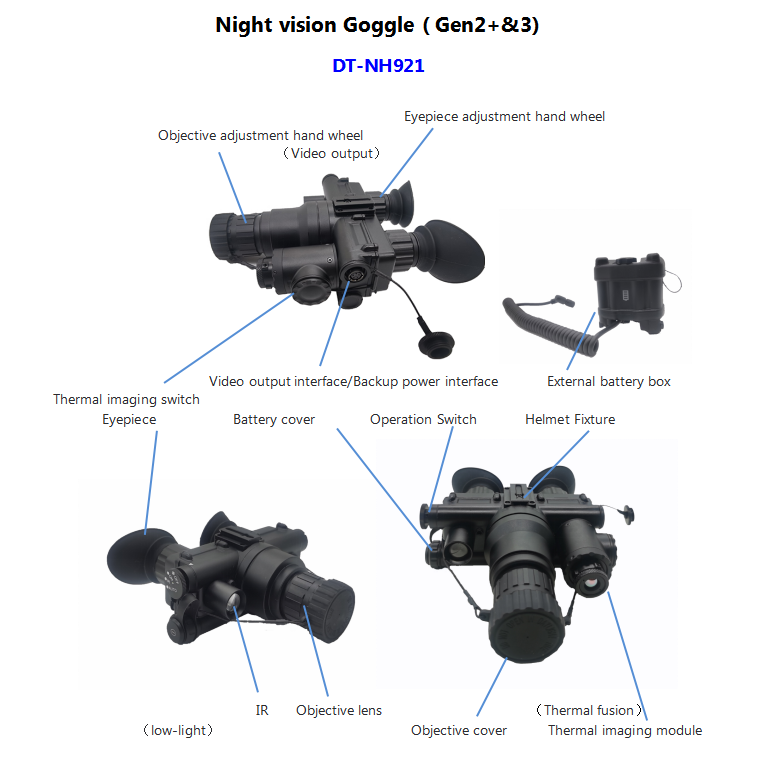
Note: This night vision device has 3 versions, all on the basis of the low-light version, optional to add video output, thermal fusion functions.
Product description:
DT-NH9 is a new product developed based on the latest optoelectronic technology. The instrument uses a high-performance second-generation/third-generation image intensifier tubes. There are 3 versions: low-light version, video output version, thermal fusion.The version has excellent performance, small size, light weight, all-metal shell, uniform vision, clear imaging, simple operation, can be equipped with night vision image output, high efficiency, and the night vision can be changed by changing the objective lens (or connecting the magnification lens) The instrument has built-in infrared auxiliary light source and automatic anti-glare protection system. This product has strong practicability and can be applied to military observation, border and sea defense police, public security surveillance, evidence collection, customs anti-smuggling, etc. at night without lighting. It is an ideal equipment for public security departments, armed police forces, special police forces, and guard patrols.
Product feature:
1.All metal housing, with excellent performance, small size, light weight .
2. Eyepiece spacing adjustable and we achieved Flip up down ON/OFF and side up down ON/OFF. (must use the original Detyl mounts).
3. Optional configuration: night vision video output, Wifi transmission can be achieved through Wifi signal transmitter .
4. The magnification can be changed by changing the objective lens (or connecting the multiplier lens)
5. Built-in IR , adjusting the light spot size.
6. In the auto mode, the IR is adjusted by environment brightness .
7. Thermal imaging function is easy to use , one-button switch, easy to operate.
8. Various thermal imaging modes, thermal imaging covers the full screen .
9. Built-in indicator light, prompt switch position function, low power indicator light keeps blinking.
10. Can be upgraded to low-light thermal fusion version with video output.
Specifications:
|
MODEL |
DT-NH921 |
DT-NH921(Thermal fusion) |
|
|
Magnification |
1X |
1X |
|
|
FOV(deg) |
42+/-3 |
42+/-3 |
|
|
Adjustable range of eye distance |
65+/-5 |
65+/-5 |
|
|
IIT |
Gen2+/Gen3 |
Gen2+/Gen3 |
|
|
Diopter(deg) |
+/-5 |
+/-5 |
|
|
Lens system |
F1.2, 25mm |
F1.2, 25mm |
|
|
Range of focus(m) |
0.25–∞ |
0.25–∞ |
|
|
Total Darkness IR System |
YES |
YES |
|
|
Automatic Brightness Control |
YES |
YES |
|
|
Bright Light Cut-off |
YES |
YES |
|
|
Infrared Illuminator |
Built-in |
Built-in |
|
|
IR Indicator |
YES |
YES |
|
|
Low Battery Indicator |
YES |
YES |
|
|
material |
Aviation aluminum |
Aviation aluminum |
|
|
Power supply(v) |
2.6-4.2V |
2.6-4.2V |
|
|
Battery type(v) |
Double A battery(2) |
Double A battery (2)+ external battery box |
|
|
Wavelength of infrared auxiliary light source (nm) |
850 |
850 |
|
|
Operating Temperature(℃) |
-40/+50 |
-40/+50 |
|
|
Relative humidity |
5%-98% |
5%-98% |
|
|
Environment rating |
IP65(IP67 Optional) |
IP65(IP67 Optional) |
|
|
Dimensions (mm) (without eye mask) |
130x130x56 |
115x127x69 |
|
|
Video output function parameters |
|||
|
Video acquisition power supply(Optional) |
external power source 5V 1W |
external power source 5V 1W |
|
|
video resolution(Optional) |
Video 1Vp-p SVGA |
Video 1Vp-p SVGA |
|
|
Thermal imaging module parameters |
|||
|
Type of sensor : |
Unrefrigerated long wave infrared thermal radiometer |
||
|
Detector resolution : |
384×288 |
||
|
Applicable wavelength :um |
8-12um |
||
|
Objective lens focal length: |
fixed-focus |
||
|
Objective aperture: |
F1.0 |
||
|
Brightness: |
adjustable |
||
|
Focusing distance: |
250mm~∞ |
||
|
Image mode: |
White heat/black heat/green bottom/red/hook edge |
||
|
Detection distance: (1.7M people) |
Detection range: 450M Identification range: 350M |
||
|
Battery: |
CR123(A)x4 2.4~4.2V |
||
Instructions:
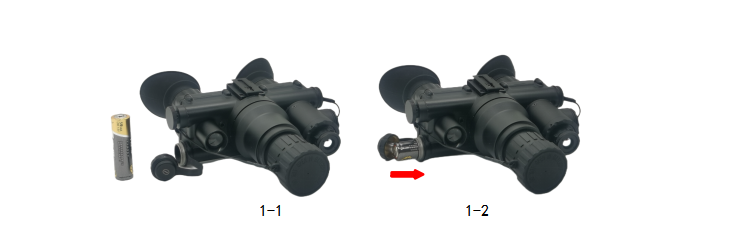
1.Battery installation
As shown in the picture: 1-1 Put 2 AA batteries (refer to the battery mark for the polarity) into the battery barrel of the night vision device, and align the battery cover with the battery barrel and tighten it clockwise, as shown in Fig. 1-2, to complete the battery installation.
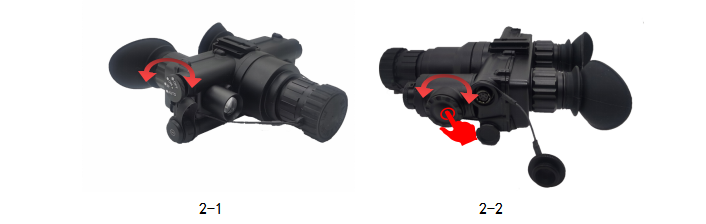
2.On/ off setting
As shown in Fig.2-1, turn the working switch clockwise by one gear, turn the indicator light to the “ON” position, and the system will start up. At this time, the low-light system will light up the image tube and start working. (Clockwise rotation: ON/IR/AUTO) The IR gear turns on the infrared auxiliary light source; the AUTO gear enters the automatic mode, etc. In any mode after starting up, when the ambient illumination reaches 40-100Lux, the entire system will automatically shut down to Protect core components from damage from strong light. The following will introduce this night vision device into two versions, the functions of the main and auxiliary control switches.
a.Low light night vision
As shown in Fig. 2-1, after turning ON the main control switch, turn the switch clockwise to set the ON, IR, and AUTO gears. You can select different gears according to the operating environment. The auxiliary control switch is to control the brightness of the infrared fill light. In the no light environment, manually adjusting the fill light brightness can get the desired fill light effect, and the night observation is more convenient. The low-light version can be selected with far-light and near-light infrared auxiliary lighting.
b.Thermal Fusion Night Vision Switch
As shown in Fig.2-1, after turning ON the main control switch, turn the switch clockwise to the ON, IR, and AUTO positions. Fig. 2-2: When the main control switch is ON/IR/AUTO, hold down the auxiliary control button (about 5 seconds) to power on the hot fusion system.
In the normal working state, long press (about 5 seconds) the thermal image system to shut down; In the normal working state, directly turn off the switch of the night vision device, the low light level system will be closed, and the normal work of the thermal image system will not be affected; Directly turn off the thermal fusion switch, the thermal image system is closed, and the normal operation of the low-light level system is not affected.
Menu operation: The switch operation of the thermal fusion module is similar to that of the thermal imager. You can select the function by rotating left and right, and click the center of the knob to confirm the function. Long press for about 5 seconds to open the hot image system, click the knob once to enter the main menu, then rotate the knob to select the menu left and right, click the center of the knob once more to enter the options in the second column of the menu, then rotate the knob again to select the options in the second column of the menu, if you need to return to the first column, you need to go to [return] and press the center of the knob.
If you select the option in the second column, rotate the button and press the button again to enter the option in the third column. When the cursor [ ] is in the third column, you can directly press the center of the knob to return to the second column. Click the center of the knob again to enter the third column to adjust the specific parameters, adjustment method: rotate the knob left and right, you can adjust the size of the parameter, adjust the mode, after the adjustment is completed, press the center of the knob to return to the second column, and then select [return] option, press the center of the knob to return to the first column; Select [Exit] in the first column, press the knob key center to exit the menu (in menu mode, short press the knob key for 3 seconds to exit the menu directly), and complete the debugging. As shown in Fig. 2-3, are the various option bars in the menu.
Mode selection: [observation mode] [plug-in mode]
System Settings: [Zoom] (1-3 times)/Brightness/Contrast/Language (Chinese, English)/Back
Image Mode: False Color (White Hot /Black Hot /Green Base /Metal /Outline )/ Breathing /Horizontal Offset /Vertical Offset/Return}
Reticle setting: icon switch [4 types]/icon switch/return
System information: version information/factory settings/return
Exit: After selecting [Exit], press the switch once to exit the menu
To sum up, the operation of the thermal fusion module can be combined with the basic functions of the night vision instrument, and the operation is simple, and the one-button knob operation can exit the thermal fusion when not in use, and the basic functions of the night vision instrument can be used.

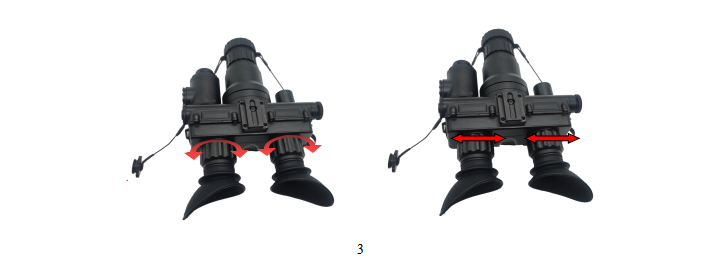
3.Eyepiece distance adjustment
Choose a target with moderate ambient brightness and adjust the eyepieces without opening the objective lens cover. As shown in Fig.3, turn the eyepiece hand wheel clockwise or counterclockwise to match the vision of the human eye. When the clearest target image can be observed through the eyepiece, the eyepiece adjustment is complete. When different users use it, they need to readjust according to their own vision. Push the eyepiece toward the middle or pull the eyepiece outward to change the distance of the eyepiece.
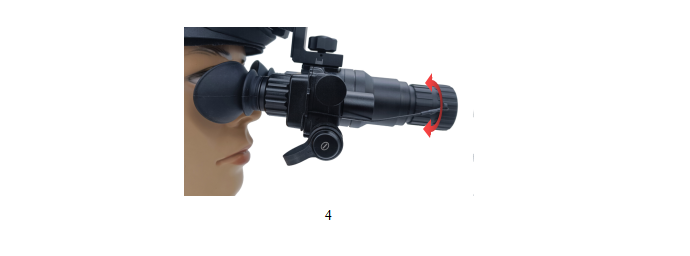
4.Eyepiece distance adjustment
The purpose of objective lens adjustment to see clearly at different distances. Before adjusting the objective lens,Please adjust the eyepieces first according to the aforementioned method. When adjusting the objective lens, please select a darker environment.
As shown in Fig.4, open the objective lens cover, aim at the target, and turn the objective lens focusing hand wheel clockwise or counterclockwise until the clearest environment image is seen, and the objective lens adjustment is completed.
When observing targets at different distances,the objective lens needs to be adjusted again according to the aforementioned method.
5.Operation Mode
This product has four working switches, a total of four modes, in addition to shutdown (OFF), there are three working modes, such as “ON”, “IR”, “AT”, respectively corresponding to the normal working mode, infrared auxiliary open mode, automatic mode, as shown in Fig.2.
6.Infrared mode
When the ambient illuminance is very low (full black environment), and the night vision cannot observe a clear image, you can turn the work switch clockwise to another gear. the system enters the “IR” mode. At this time, the built-in infrared auxiliary lighting of the product is turned on to ensure normal use in a completely dark environment.
Note: In the infrared mode, if you encounter similar equipment, it is easy to expose the target.
7.Auto Mode
The automatic mode is different from the “IR” mode. The automatic mode activates the environmental detection sensor, which can detect the environmental illuminance in real time, and test the work of the environmental reference degree control system. In a very low ambient or dark environment, the system will automatically turn on the infrared auxiliary lighting. When the ambient illuminance can meet the normal observation, the system will automatically turn off “IR”. When the ambient illuminance reaches 40-100 Lux, the entire system will automatically turn off. In order to protect the photosensitive core components from being damaged by strong light.
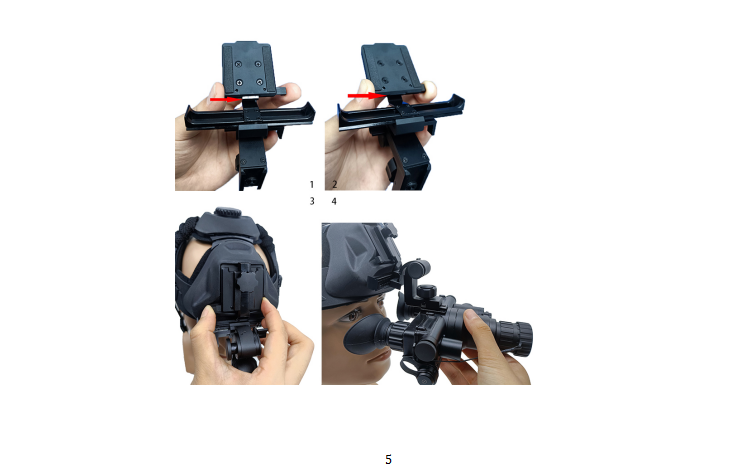
8.Head-mounted installation
First, turn the knob on the helmet mount device to the end of the clock counter clockwise.Then use the universal fixture of the night vision instrument to one end of the eyepiece to the equipment slot of the helmet hanging device. Press the device button on the helmet mount vigorously. At the same time, the night vision instrument is pushed along the equipment slot. Until the button of center is moved to the middle at the universal fixture. At this time, release the anti button, turn the equipment locking knob clockwise and lock the equipment. As shown in Fig.5.
After installing the night vision instrument, Fasten the pendant of helmet mount to the general equipment slot of the soft helmet. Then press the lock button of the Helmet Pendant. At the same time, the components of the night vision instrument and Helmet Pendant are rotated counterclockwise. When the helmet mount connector is completely attached to the universal equipment slot of the soft helmet, Loosen the lock button of the Helmet Pendant and lock the product components on the soft helmet. As shown in Fig. 6.
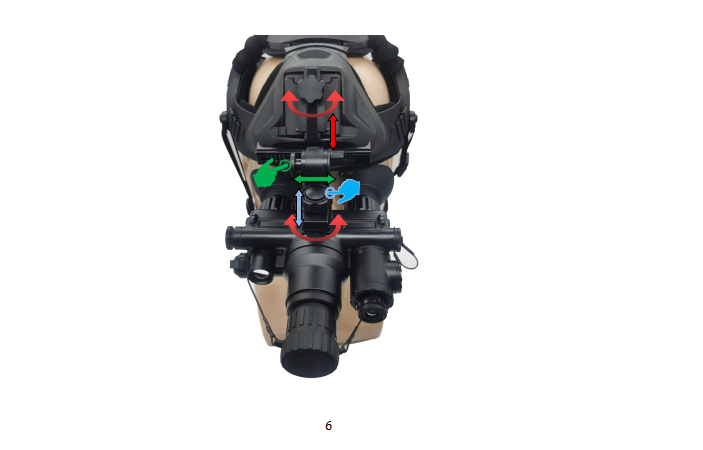
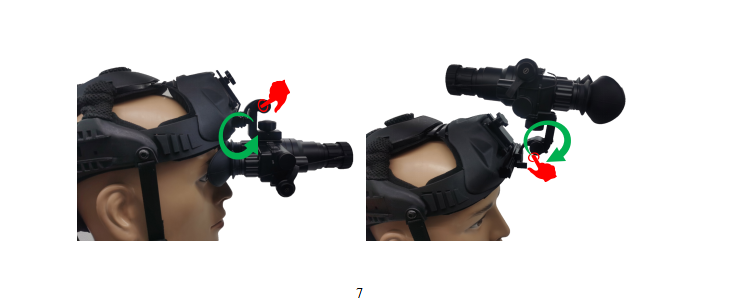
9.Helmet adjustment
In order to ensure the user’s comfort when using this system, the helmet pendant system is designed with a perfect fine-tuning structure to meet the needs of different users.
Up and down adjustment: Loosen the height locking knob of the helmet pendant counterclockwise,slide this knob up and down, adjust the product eyepiece to the most suitable height for observation,and turn the height locking knob of the helmet pendant clockwise to lock the height. As shown in Fig.7 the red icon.
Left and right adjustment: Use your fingers to press the left and right adjustment buttons of the helmet pendant to slide the night vision components horizontally. When adjusted to the most suitable position, release the left and right adjustment buttons of the helmet pendant, and the night vision components will lock this Position, complete left and right horizontal adjustment. As shown in green in Fig.7.
Front and back adjustment: When you need to adjust the distance between the night vision goggles and the human eye, first turn the equipment locking knob of the helmet pendant counterclockwise, and then slide the night vision goggles back and forth. After adjusting to the proper position, turn the equipment clockwise to lock Turn the knob, lock the device, and complete the front and back adjustment, as shown in blue in Fig.7.
10. Head flip
After the product has been worn, in the actual use process, if the night vision goggles are not used temporarily, the night vision goggles can be flipped and placed on the helmet, so that it will not affect the current sight line, and it is convenient to use at any time. When you need to observe with the naked eye, press and hold the flip button of the helmet pendant to flip the night vision component upwards. When the angle reaches 170 degrees, release the flip button of the helmet pendant, and the system will automatically lock the flip state; you need to put down the night vision component .When observing, you also need to press the flip button of the helmet pendant first, and the night vision component will automatically turn back to the working position and lock the working position. When the night vision component is turned over to the helmet, the system night vision device will be automatically turned off. When it is turned back to the working position, the night vision device system will automatically turn on and work normally. As shown in Fig.8.
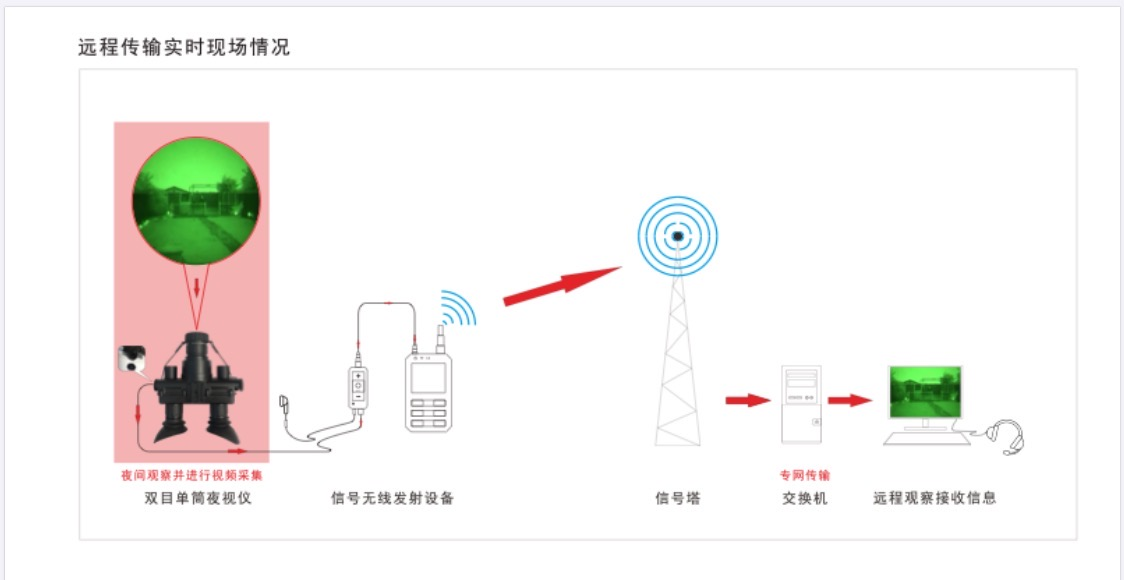
11.Video output
This hot fusion version can add video output.
As shown in Fig.8 below, the binocular monocular DT-NH921 night vision instrument can carry out video acquisition while observing. The collected video can be transmitted in real time through signal wireless transmitting equipment, signal towers and switches, so that remote observers can receive the transmitted information, so as to achieve accurate command in different Spaces and at the same time.
To use this function, you only need to connect the signal wireless transmission device on the original basis.
8
12.Objective lens replacement
This night vision instrument can be replaced with different magnification of the objective lens to meet the requirements of different observation distances (note: after the replacement of the objective lens, the waterproof power will decrease). When replacing the objective lens, rotate the objective lens counterclockwise to remove the objective lens installed on the night vision device, and then rotate the objective lens to be replaced clockwise to install it on the night vision device main engine.
13.Double mirror mounting
The night vision instrument not only supports changing the objective lens with different magnification, but also supports series magnification to change the viewing magnification to meet the requirements of different viewing distances. (When the series magnifier is used, it has no effect on the waterproof ability of the night vision instrument.) Before the series magnifier, open the cover of the original objective lens and twist the mirror of the corresponding caliber directly to the front end of the original objective lens. The multiplier mirror also supports direct multistage series. The series mode of the multiplier mirror is the same as that of the objective mirror series. The night vision instrument supports three magnification mirrors in series, with a maximum magnification of 6X.
Common questions:
- No power
A. please checks whether the battery is loaded.
B. checks whether there is electricity in the battery.
C. confirms that the ambient light is not too strong.
- Target Image is not clear
A. check the eyepiece, whether the objective lens is dirty.
B. Check the lens cover open or not ?if at night time
C. confirm whether the eyepiece is properly adjusted (refer to eyepiece adjustment operation).
D. Confirm the focusing of the objective lens ,whether finished adjusted.r (referring objective lens focusing operation).
E. confirms whether infrared light is enabled when the environments all back.
- Automatic detection not working
A. automatic mode, when glare automatic protection does not work. Please check if the environmental testing department is blocked.
B. flip, the night vision system does not automatically turn off or install on the helmet. When the system is in normal observation position, the system cannot start normally. Please check the position of the helmet mount is fixed with the product. (reference headwear installation)
Noted:
1.Anti-strong light
The night vision system is designed with automatic anti-glare device. It will automatically protect when encountering strong light. Although the strong light protection function can maximize the protection of the product from damage when exposed to strong light, but repeated strong light irradiation will also accumulate damage. So please do not put products in strong light environment for a long time or many times. So as not to cause permanent damage to the product.
2.Moisture-proof
The night vision product design has waterproof function, its waterproof ability up to IP67 (optional), but long-term humid environment will also slowly erode the product, causing damage to the product. So please store the product in a dry environment.
3.Use and preservation
This product is a high precision photoelectric product. Please operate strictly according to the instructions. Please remove the battery when it is not used for a long time. Keep the product in a dry, ventilated and cool environment, and pay attention to shading, dust-proof and impact prevention.
4.Do not disassemble and repair the product during use or when it is damaged by improper use. Please contact the distributor directly.
Post time: Jun-29-2023

